Wednesday, December 4, 2013
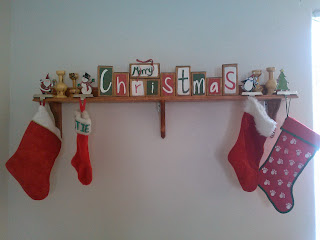
Merry Christmas Blocks
I saw this idea on Pinterest and knew that I had to make my own version!
Sorry I didn't get pictures of my step by steps. This was an impulsive project!
To start you will need:
2X4's (You can use other dimensions of stock lumber. I liked the way the 2X4 blocks looked)
Paint
Stain
Ribbon
Lettering Stencil
Tools Used:
Planer (We planed down our 2X4's to make them less "rustic" and easier to work with. Not necessary if you would rather sand them down.)
Table Saw (To make nice square edges)
Router table with 1/4 inch round over bit
Sander with 100 grit sandpaper and some finer for finish sanding (I used 320)
Paint brushes and a foam brush for the stain
Safety glasses/Ear protection
To Start:
Figure out how big you want your blocks and what phrase you want. I used "Merry Christmas" and alternated the heights of my blocks. I have 4 different heights-the tallest being 6 1/2 inches, next is 5 1/4 inches the shortest is 4 inches. The 'Merry' block across my first 2 short blocks I made to fit it the space which turned out to be 6 1/4 inches. I would definitely recommend making the 'Christmas' blocks before, then measure the space for the 'Merry' Block
Now that you know how long of a 2x4 you need (or in my case how many scrap pieces I could round up) you can plane them down and then square them up on a table saw (or a jointer.) My husband actually beat me to this and had them done before I even knew what was going on :). He just made them so they were nice and square. Note-this will effect the final thickness and width of the block. This is okay. This is why I recommend to make the 'Christmas' blocks before measuring the 'Merry' block.
Once he had that done for me I rounded over all of the edges on our router table. I liked the way the 1/4 inch round over looked, of course you can use what bit you prefer, or leave the edges alone. When using the router table it is very important to run the edge right to left or in a clockwise direction starting with the end grain side. You will have "tear out" on the end grain, but when you start routering the edge grain you will clean up the previous "tear out".
Once I had rounded over all of my edges on every block, I sanded them down til smooth using 100 grit sand paper and the orbital sander. Then hand sanded with my very fine sandpaper (320 grit).
I chose to stain my blocks before painting them. I did Minwax's Early American. Once those were dry, I took my Christmas colored paints and got creative. Instead of buying craft acrylic paint from a craft store I actually go to the hardware store and pick out the colors I want and have them made in the sample sizes. You get a great quality and quantity of paint for less expense!!
After painting the different colored background for my letters I downloaded the Just The Way You Are font that I had found on Pinterest. I did not know this before but you can find free fonts and download them. Then save them to your computer, and when you pull up your font list on your word processor it will be there!! How cool is that?!?!
I typed out 'Merry Christmas' on Word then changed the font so it was just the outline. (No need to waste a whole bunch of black ink). The only way I could figure out how to size the letters the way I wanted them was to copy and paste them into Paint. I was then able to size them the way I wanted and print them out. Since I used the outline I cut out the letter to make a stencil. Yes, this was very time consuming but way worth it! I took a pencil and traced the stencil and then painted them.
Be creative! I plan on making other block sets with different sayings and pictures. I have also seen these to be reversible! How cool is it that you can have one decoration and make it work for two holidays?
Enjoy!
Kirstie
Subscribe to:
Post Comments (Atom)

No comments:
Post a Comment